
Getting started
In this guide, we’ll be using a combination of AdminJS, Next.js, React, and Postgres to build a blog. These tools are all top-notch when it comes to creating dynamic and functional websites, so you can be sure that your blog will be looking great while very easy to manage. You will be able to customize the design, add features, and publish content with ease, all thanks to AdminJS. The entire project folder structure will look like this:
.
├── backend
│   ├── index.ts
│   └── package.json
│   └── tsconfig.json
└── frontend
    ├── package.json
    └── pages
        ├── _app.js
        ├── components
        │   ├── AnimatedText.component.js
        │   ├── Cards.component.js
        │   └── Menu.components.js
        ├── index.js
        ├── public
        │   └── favicon.ico
        └── styles
            ├── globals.css
            └── styles.mui.js
The repository for this article can be found here: https://github.com/AdamFrydrychRST/BlogArticle
Setting up the database
Postgres is the database choice due to its great integration with AdminJS. We’ve recently released a SQL adapter that fetches the schema from the database on its own.
We’re going to use docker-compose to deploy the Postgres database. Create a ‘stack.yml’ file.
version: '3.1'

services:
  db:
    image: postgres
    restart: always
    environment:
      POSTGRES_PASSWORD: example
      POSTGRES_USER: postgres
    ports:
      - 5432:5432
  adminer:
    image: adminer
    restart: always
    ports:
- 8080:8080Once created, run the docker-compose command to bring the container to life.
$ docker-compose -f stack.yml upWe’re going to use Adminer to set up the database tables. In order to log into Adminer, head over to localhost:8080. Set the System to ‘PostgreSQL’, server to ‘db’, Username to ‘postgres’, and Password to ‘example’.
Create a database called ‘Blog’, then inside create a table called ‘posts’, with the following columns:
- cardHeaderTitle — type: character varying — this will be the title of the blog post
- cardHeaderSub — type: date — additionally, add a default value of ‘now()’ so that it always adds a date to our blog post
- cardContent — type: character varying — this will hold the blog post content
- id — type: integer — make sure to make this an index value (AI checkbox)
Setting up AdminJS instance
Head over to the ‘backend’ folder and create a file called ‘index.ts’. The first things we’re going to take care of are: setting up the adapter, connecting to the database, and setting up the posts resource.
In order to do that, we will have to install dependencies. My package manager of choice is yarn.
$ yarn add adminjs
$ yarn add express
$ yarn add express-formidable
$ yarn add express-session
$ yarn add @adminjs/express
$ yarn add @adminjs/sql
With the dependencies installed, open the file called ‘index.ts’ and add the following code:
import AdminJS from 'adminjs';
import express from 'express';
import AdminJSExpress from '@adminjs/express';
import Adapter, { Database, Resource } from '@adminjs/sql';

const PORT = 3001;

// We'll need to register the SQL Adapter
AdminJS.registerAdapter({
 Database,
 Resource,
});

const start = async () => {
 const app = express();
 // This facilitates the connection to the postgres database
 const db = await new Adapter('postgresql', {
  connectionString: 'postgresql://postgres:example@localhost:5432/Blog',
  database: 'Blog',
 }).init();

 // We will need to create an instance of AdminJS
 const admin = new AdminJS({
  resources: [
   { resource: db.table('posts') },
  ],
 });
 const adminRouter = AdminJSExpress.buildRouter(admin);
 app.use(admin.options.rootPath, adminRouter);
 app.listen(PORT, () => {
  console.log(`AdminJS started on http://localhost:${PORT}${admin.options.rootPath}`);
 });
};

start();Let’s see if we can add our first blog post through the AdminJS panel. Open the backend ‘package.json’ file and add a ‘dev’ script to it.
{
  "name": "blog-backend",
  "version": "1.0.0",
  "type": "module",
  "author": "AF",
  "license": "MIT",
  "scripts": {
    "build": "tsc",
    "start: "node dist/index"
  },
  "dependencies": {
    "@adminjs/express": "^6.0.0",
    "@adminjs/sql": "^2.0.0",
    "adminjs": "^7.0.0",
    "express": "^4.18.2",
    "express-formidable": "^1.2.0",
    "express-session": "^1.17.3",
  }
}Now that we want to use Typescript to build our code, we will need to add all developer dependencies.
$ yarn add -D typescript
$ yarn add -D tslib
You should also create a tsconfig.json file:
{
  "compilerOptions": {
    "jsx": "react",
    "module": "nodenext",
    "moduleResolution": "nodenext",
    "declaration": false,
    "removeComments": true,
    "emitDecoratorMetadata": true,
    "experimentalDecorators": true,
    "allowSyntheticDefaultImports": true,
    "allowJs": true,
    "target": "ESNext",
    "sourceMap": false,
    "outDir": "./dist",
    "baseUrl": ".",
    "incremental": true,
    "skipLibCheck": true,
    "resolveJsonModule": true,
    "esModuleInterop": true
  },
  "exclude": ["node_modules"],
}
With the dependencies installed, we’re ready to launch AdminJS.
$ yarn build && yarn startThe panel will be available at http://localhost:3001/admin, where you will be able to add your first blog post.

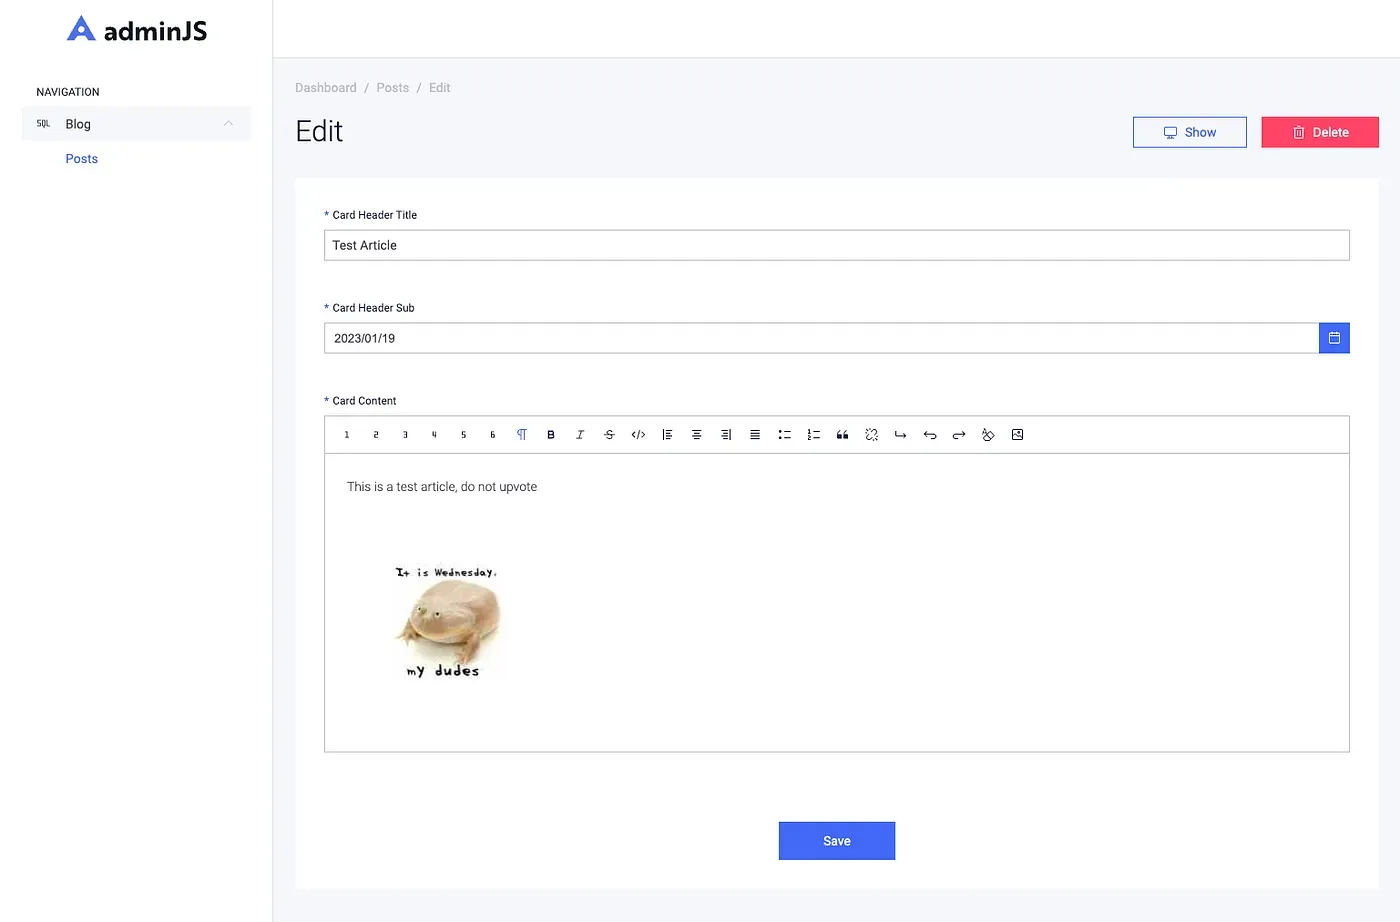
There is one small thing that would be nice to address right now, namely a rich text editor. After all, we want all blog posts to be something more than just a bunch of words, we want to be able to import images, add headings, and add links.
const admin = new AdminJS({
    resources: [
      {
        resource: db.table('posts'),
        options: {
          properties: {
            cardContent: {
              type: 'richtext',
            },
          },
        },
      },
    ],
  });
Much better.
Building a blog with Next.js
Now that the backend part of things is sorted, let’s take care of the pretty parts.
Next.js is a fronted framework that will take care of the navigation components and blog posts. We’re going to mostly rely on readily available React components.
Let’s start by initializing yarn. Navigate to your project directory and create a new folder called ‘frontend’. Once inside the new folder — initialize your project.
$ yarn initMake sure to point to ‘pages/index.js’ as the entry point of your app. Next, inside the pages folder, create ‘components’, ‘styles’, ‘public’ folders, and a ‘index.js’ file. Inside the ‘components’ folder create files named ‘Cards.component.js’, ‘Menu.components.js’, and ‘AnimatedText.components.js’.
We will need to take care of our dependencies:
$ yarn add react
$ yarn add react-dom
$ yarn add next
$ yarn add axios
$ yarn add @mui/material
$ yarn add @mui/lab
$ yarn add @emotion/react
$ yarn add @emotion/styled
We’re going to use React.js, Next.js, Axios, and MUI. Axios is here to take care of the API requests, and MUI will provide clean-looking and easy-to-use components.
Displaying all our blog posts
Now that most of our files and folders are created, we can start working on the way the blog posts are going to be displayed. We want all the blog posts to be shown as soon as they are added to the database. In order to do that, we will need to fetch data from the backend. Luckily, that’s pretty easy with AdminJS, as it provides a convenient API for that.
Inside the ‘Cards.component.js’ file, we will create a class called ‘PostList’ and add the following code. Keep in mind you will have to import React first.
import * as React from 'react';

export default class PostList extends React.Component {
  state = {
    posts: [],
  };
  render() {
    return (
      <>
        {this.state.posts.map((post) => (
          <div key={post.params.id}>{this.generatePost(post)}</div>
        ))}
      </>
    );
  }
}In order to fetch all our blog posts, we will need to use Axios and point it at Admin’s API address, which is ‘http://localhost:3001/admin/api/resources/posts/actions/list'. Be sure to add ‘?direction=desc&sortBy=id’ at the end of it, as we want our messages sorted from newest to oldest.
Let’s add a ‘componentDidMount’ method inside the class. This method will be called every time our PostList component mounts. With a bit of JSON beautifying, we know that ‘res.data.records’ is an array of objects, and to be more precise an array of posts.
import axios from 'axios';

// ...

componentDidMount() {
    	axios.get(`http://localhost:3001/admin/api/resources/posts/actions/list?direction=desc&sortBy=id`).then((res) => {
      const posts = res.data.records;
      this.setState({ posts });
    });
  }
Next up, we need a way to take all the data from the API response and put it in a readable format. For that, we will create a ‘generatePost’ method.
import Card from '@mui/material/Card';
import CardHeader from '@mui/material/CardHeader';
import CardContent from '@mui/material/CardContent';

// ...

generatePost(record) {
    const date = new Date(record.params.cardHeaderSub);
    return (
      <Card>
        <CardHeader title={record.params.cardHeaderTitle} subheader={date.toLocaleDateString()} />
        <CardContent>
          <div dangerouslySetInnerHTML={{ __html: record.params.cardContent }} />
        </CardContent>
      </Card>
    );
  }
Now, let’s add the component we just created to the landing page of our website. Open the file called ‘index.js’ and add the following code.
import Head from 'next/head';
import PostList from './components/Cards.component'

export default function Home() {
  return (
    <>
    <Head>
      <title>Welcome to my blog!</title>
    </Head>
    <PostList />
    </>
  );
}Let’s see what the page looks like currently and if the component fetching data from the database is working correctly.
Head to the frontend ‘package.json’ file and add a ‘dev’ script. This time, however, we will be using Next.js to run it.
{
  "name": "blog-frontend",
  "version": "1.0.0",
  "main": "pages/index.js",
  "scripts": {
    "dev": "next dev"
  },
  "author": "AF",
  "license": "MIT",
  "dependencies": {
    "@emotion/react": "^11.10.5",
    "@emotion/styled": "^11.10.5",
    "@mui/material": "^5.11.5",
    "axios": "^1.2.3",
    "next": "^13.1.2",
    "react": "^18.2.0",
    "react-dom": "^18.2.0"
  }
}Run the dev command through yarn in your terminal (make sure you’re in the root directory of the frontend app).
$ yarn run dev
The website will be accessible at ‘http://localhost:3000/'.

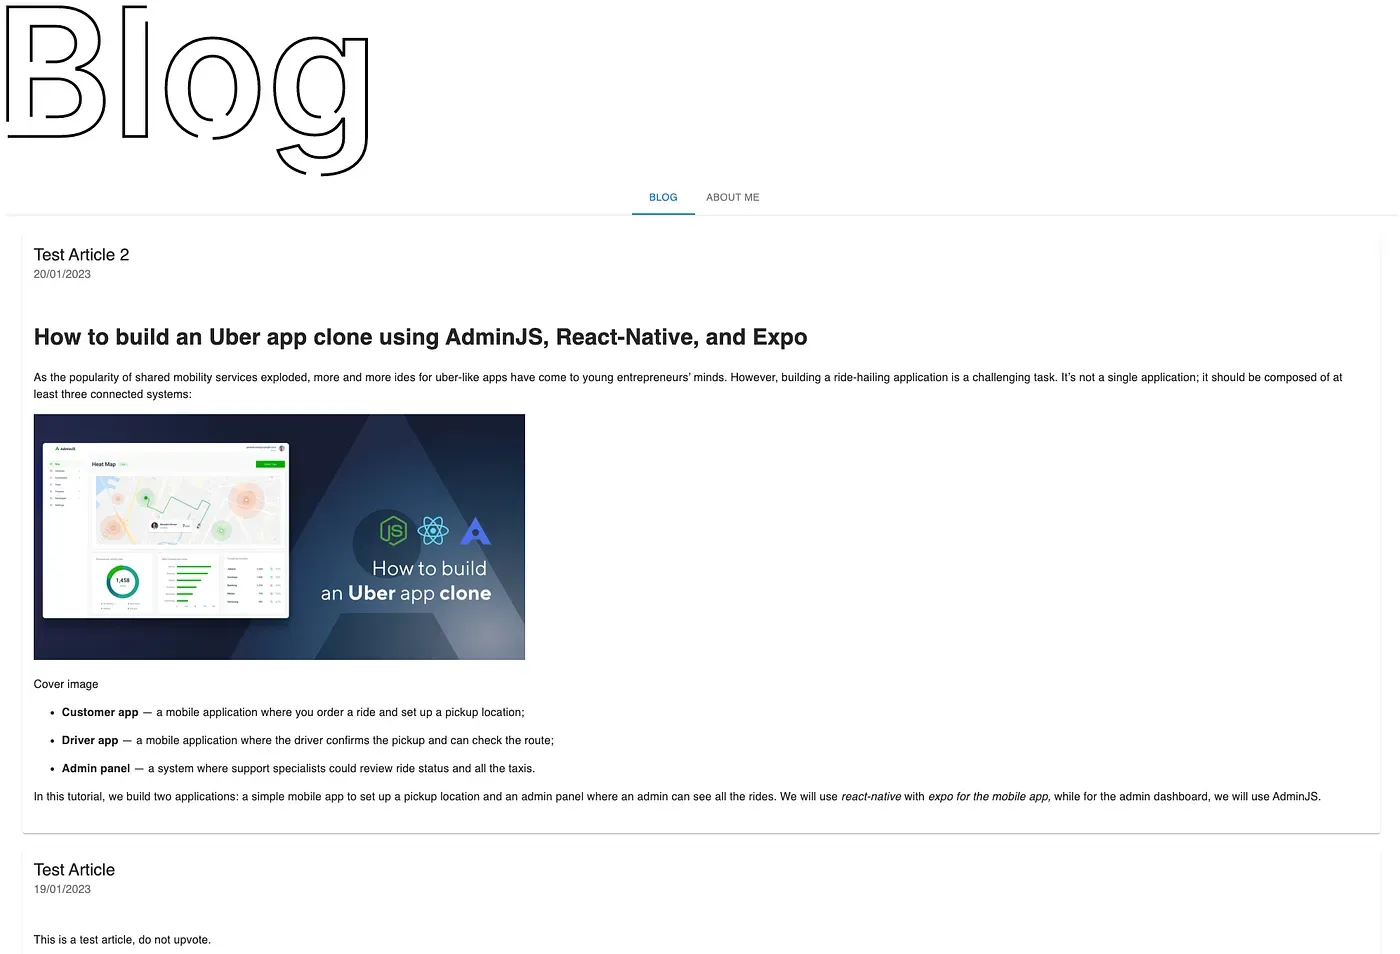
That’s more like it! We’ve got the first blog post already there. Time to add some more functionality and pizazz added to our blog template.
Head to the file called ‘Menu.component.js’. We’ll create really simple tab-based navigation.
import * as React from 'react';
import Box from '@mui/material/Box';
import Tab from '@mui/material/Tab';
import TabContext from '@mui/lab/TabContext';
import TabList from '@mui/lab/TabList';
import TabPanel from '@mui/lab/TabPanel';

export default function MenuApp(tab1, tab2) {
  const [value, setValue] = React.useState('1');
  const handleChange = (event, newValue) => {
    setValue(newValue);
  };
  return (
    <Box sx={{ width: '100%', typography: 'body1' }}>
      <TabContext value={value}>
        <Box sx={{ borderBottom: 1, borderColor: 'divider' }}>
          <TabList onChange={handleChange} centered>
            <Tab label="Blog" value="1" />
            <Tab label="About me" value="2" />
          </TabList>
        </Box>
        <TabPanel value="1">{tab1}</TabPanel>
        <TabPanel value="2">{tab2}</TabPanel>
      </TabContext>
    </Box>
  );
}I’ve added an ‘About me’ section, after all the nav component has to be used for something, right?
In the ‘index.js’ file, we will need to add our menu app object and wrap blog posts with it.
import Head from 'next/head';
import PostList from './components/Cards.component'
import MenuApp from './components/Menu.components';

export default function Home() {
  return (
    <>
    <Head>
      <title>Welcome to my blog!</title>
    </Head>
    {MenuApp(<PostList />)}
    </>
  );
}Adding pizzas to every blog post
All there’s left to do is to add some pizazz with an animated logo. Head to the ‘pages’ folder, inside of which you will find ‘components’ and finally the ‘AnimatedText.component.js’. You will have to import React here too.
import React from 'react';

const Logo = () => {
  return (
    <svg className="logo" viewBox="0 0 500 62">
      <path
        stroke="#000000"
        fill="none"
        d="M0.747159 47V0.454544H18.5653C21.929 0.454544 24.7244 0.984847 26.9517 2.04545C29.1941 3.09091 30.8684 4.52273 31.9744 6.34091C33.0956 8.15909 33.6562 10.2197 33.6562 12.5227C33.6562 14.4167 33.2926 16.0379 32.5653 17.3864C31.8381 18.7197 30.8608 19.803 29.6335 20.6364C28.4062 21.4697 27.035 22.0682 25.5199 22.4318V22.8864C27.1714 22.9773 28.7547 23.4848 30.2699 24.4091C31.8002 25.3182 33.0502 26.6061 34.0199 28.2727C34.9896 29.9394 35.4744 31.9545 35.4744 34.3182C35.4744 36.7273 34.8911 38.8939 33.7244 40.8182C32.5578 42.7273 30.8002 44.2348 28.4517 45.3409C26.1032 46.447 23.1487 47 19.5881 47H0.747159ZM9.17898 39.9545H18.2472C21.3078 39.9545 23.5123 39.3712 24.8608 38.2045C26.2244 37.0227 26.9062 35.5076 26.9062 33.6591C26.9062 32.2803 26.5653 31.0379 25.8835 29.9318C25.2017 28.8106 24.232 27.9318 22.9744 27.2955C21.7169 26.6439 20.2169 26.3182 18.4744 26.3182H9.17898V39.9545ZM9.17898 20.25H17.5199C18.9744 20.25 20.285 19.9848 21.4517 19.4545C22.6184 18.9091 23.535 18.1439 24.2017 17.1591C24.8835 16.1591 25.2244 14.9773 25.2244 13.6136C25.2244 11.8106 24.5881 10.3258 23.3153 9.15909C22.0578 7.99242 20.1866 7.40909 17.7017 7.40909H9.17898V20.25ZM50.6733 0.454544V47H42.446V0.454544H50.6733ZM74.3608 47.6818C70.9517 47.6818 67.9972 46.9318 65.4972 45.4318C62.9972 43.9318 61.0578 41.8333 59.679 39.1364C58.3153 36.4394 57.6335 33.2879 57.6335 29.6818C57.6335 26.0758 58.3153 22.9167 59.679 20.2045C61.0578 17.4924 62.9972 15.3864 65.4972 13.8864C67.9972 12.3864 70.9517 11.6364 74.3608 11.6364C77.7699 11.6364 80.7244 12.3864 83.2244 13.8864C85.7244 15.3864 87.6563 17.4924 89.0199 20.2045C90.3987 22.9167 91.0881 26.0758 91.0881 29.6818C91.0881 33.2879 90.3987 36.4394 89.0199 39.1364C87.6563 41.8333 85.7244 43.9318 83.2244 45.4318C80.7244 46.9318 77.7699 47.6818 74.3608 47.6818ZM74.4062 41.0909C76.2547 41.0909 77.8002 40.5833 79.0426 39.5682C80.285 38.5379 81.2093 37.1591 81.8153 35.4318C82.4366 33.7045 82.7472 31.7803 82.7472 29.6591C82.7472 27.5227 82.4366 25.5909 81.8153 23.8636C81.2093 22.1212 80.285 20.7348 79.0426 19.7045C77.8002 18.6742 76.2547 18.1591 74.4062 18.1591C72.5123 18.1591 70.9366 18.6742 69.679 19.7045C68.4366 20.7348 67.5047 22.1212 66.8835 23.8636C66.2775 25.5909 65.9744 27.5227 65.9744 29.6591C65.9744 31.7803 66.2775 33.7045 66.8835 35.4318C67.5047 37.1591 68.4366 38.5379 69.679 39.5682C70.9366 40.5833 72.5123 41.0909 74.4062 41.0909ZM113.253 60.8182C110.298 60.8182 107.76 60.4167 105.639 59.6136C103.518 58.8258 101.813 57.7652 100.526 56.4318C99.2377 55.0985 98.3438 53.6212 97.8438 52L105.253 50.2045C105.586 50.8864 106.071 51.5606 106.707 52.2273C107.344 52.9091 108.2 53.4697 109.276 53.9091C110.366 54.3636 111.738 54.5909 113.389 54.5909C115.723 54.5909 117.654 54.0227 119.185 52.8864C120.715 51.7652 121.48 49.9167 121.48 47.3409V40.7273H121.071C120.647 41.5758 120.026 42.447 119.207 43.3409C118.404 44.2348 117.336 44.9848 116.003 45.5909C114.685 46.197 113.026 46.5 111.026 46.5C108.344 46.5 105.912 45.8712 103.73 44.6136C101.563 43.3409 99.8362 41.447 98.5483 38.9318C97.2756 36.4015 96.6392 33.2348 96.6392 29.4318C96.6392 25.5985 97.2756 22.3636 98.5483 19.7273C99.8362 17.0758 101.571 15.0682 103.753 13.7045C105.935 12.3258 108.366 11.6364 111.048 11.6364C113.094 11.6364 114.776 11.9848 116.094 12.6818C117.427 13.3636 118.488 14.1894 119.276 15.1591C120.063 16.1136 120.662 17.0152 121.071 17.8636H121.526V12.0909H129.639V47.5682C129.639 50.553 128.927 53.0227 127.503 54.9773C126.079 56.9318 124.132 58.3939 121.662 59.3636C119.192 60.3333 116.389 60.8182 113.253 60.8182ZM113.321 40.0455C115.063 40.0455 116.548 39.6212 117.776 38.7727C119.003 37.9242 119.935 36.7045 120.571 35.1136C121.207 33.5227 121.526 31.6136 121.526 29.3864C121.526 27.1894 121.207 25.2652 120.571 23.6136C119.95 21.9621 119.026 20.6818 117.798 19.7727C116.586 18.8485 115.094 18.3864 113.321 18.3864C111.488 18.3864 109.957 18.8636 108.73 19.8182C107.503 20.7727 106.579 22.0833 105.957 23.75C105.336 25.4015 105.026 27.2803 105.026 29.3864C105.026 31.5227 105.336 33.3939 105.957 35C106.594 36.5909 107.526 37.8333 108.753 38.7273C109.995 39.6061 111.518 40.0455 113.321 40.0455Z"
      />
    </svg>
  );
};
export default Logo;Mind you all the numbers are needed here, due to the fact that we’re importing a .svg file.
Next, in the ‘index.js’ file, we’ll import and then drop the logo component, like so:
import Head from 'next/head';
import PostList from './components/Cards.component'
import MenuApp from './components/Menu.components';
import Logo from './components/AnimatedText.component';

export default function Home() {
  return (
    <>
    <Head>
      <title>Welcome to my blog!</title>
    </Head>
    <Logo />
    {MenuApp(<PostList />)}
    </>
  );
}I’ve added another post to test things and, as you can clearly see, the blog posts are too close to each other.

We’ll take care of that and a couple of other things with a bit of styling. First, in the folder called ‘styles’ find the ‘styles.mui.js’ file.
import { createTheme } from '@mui/material/styles';

export const theme = createTheme({
  components: {
    MuiCard: {
      styleOverrides: {
        root: {
          marginBottom: 20,
        },
      },
    },
  },
});Then, we’ll have to append the style sheet we’ve created to our components. Head to ‘index.js’ to do that.
import { ThemeProvider } from '@mui/material'
import { theme } from './styles/styles.mui'

// ...

<ThemeProvider theme={theme}>{MenuApp(<PostList />)}</ThemeProvider>

// ...
The last two things we’re going to add are animation to an otherwise overly static logo and an override that hides the scrollbar. Open the ‘globals.css’ file.
::-webkit-scrollbar {
  display: none;
}

.logo path {
  width: 100%;
  color: #000000;
  stroke-width: 1px;
  stroke-dashoffset: -300;
  stroke-dasharray: 5000;
  animation-name: icon;
  animation-duration: 3s;
  animation-iteration-count: initial;
  animation-fill-mode: forwards;
}
@keyframes icon {
  50% {
    stroke-dashoffset: 0;
    fill: transparent;
  }
  65% {
    stroke-dashoffset: 0;
    fill: #000000;
    stroke-width: 1px;
  }
  100% {
    stroke-dashoffset: 0;
    fill: #000000;
    stroke-width: 1px;
  }
}However, Next.js won’t use the ‘globals.css’ file until we explicitly tell it to do so. You will have to create a file called ‘_app.js’ in the ‘pages’ folder. Inside we will define a function ‘MyApp’.
import './styles/globals.css';

function MyApp({ Component, pageProps }) {
  return <Component {...pageProps} />;
}

export default MyApp;And just like that, we’ve got a simple blog template that can be managed by someone with a basic understanding, as we’ve got AdminJS to help with that.
Further steps
We’ve created a blog template with Next.js, AdminJS, and React. Simple, yet functional. You can easily add new posts with AdminJS’s rich text editor. There are a lot of options to customize your own blog now and most importantly you don’t have to be a full-blown backend developer or a React developer to do so.
If you run into issues while building your own blog, or would like to have a quick chat with me and the team behind AdminJS, be sure to check out our Slack Community. If you are looking for an even easier way of building a CMS for your blog, we’ve got a made-to-order Cloud-based solution for which a trial period is now available!
