
As the popularity of shared mobility services exploded, more and more ides for uber-like apps have come to young entrepreneurs’ minds. However, building a ride-hailing application is a challenging task. It’s not a single application; it should be composed of at least three connected systems:
- Customer app — a mobile application where you order a ride and set up a pickup location;
- Driver app — a mobile application where the driver confirms the pickup and can check the route;
- Admin panel — a system where support specialists could review ride status and all the taxis.
In this tutorial, we build two applications: a simple mobile app to set up a pickup location and an admin panel where an admin can see all the rides. We will use react-native with expo for the mobile app, while for the admin dashboard, we will use AdminJS.
Building an Uber clone app
Setting up the development environment
Before we delve into setting up the development environment, we need to begin our expo project:
$ yarn create expo-app uber-cloneExpo is a toolset that allows users to build and test mobile apps. Running the above command will create a new folder with all the files and libraries preinstalled, so you can start developing your mobile app project immediately.
The main file we are going to work with is App.js. It contains the main component of your application. As you can see, at this moment, it only includes twenty lines of code with a very simple <Text> component and some CSS styles.
import { StatusBar } from 'expo-status-bar';
import { StyleSheet, Text, View } from 'react-native';

export default function App() {
  return (
    <View style={styles.container}>
      <Text>Open up App.js to start working on your app!</Text>
      <StatusBar style="auto" />
    </View>
  );
}

const styles = StyleSheet.create({
  container: {
    flex: 1,
    backgroundColor: '#fff',
    alignItems: 'center',
    justifyContent: 'center',
  },
});
To run this code, you will need to execute it using the following command:
$ expo startAfter running the command, your terminal prompt will show you a simple QR code. We will need it to run the application on our device.
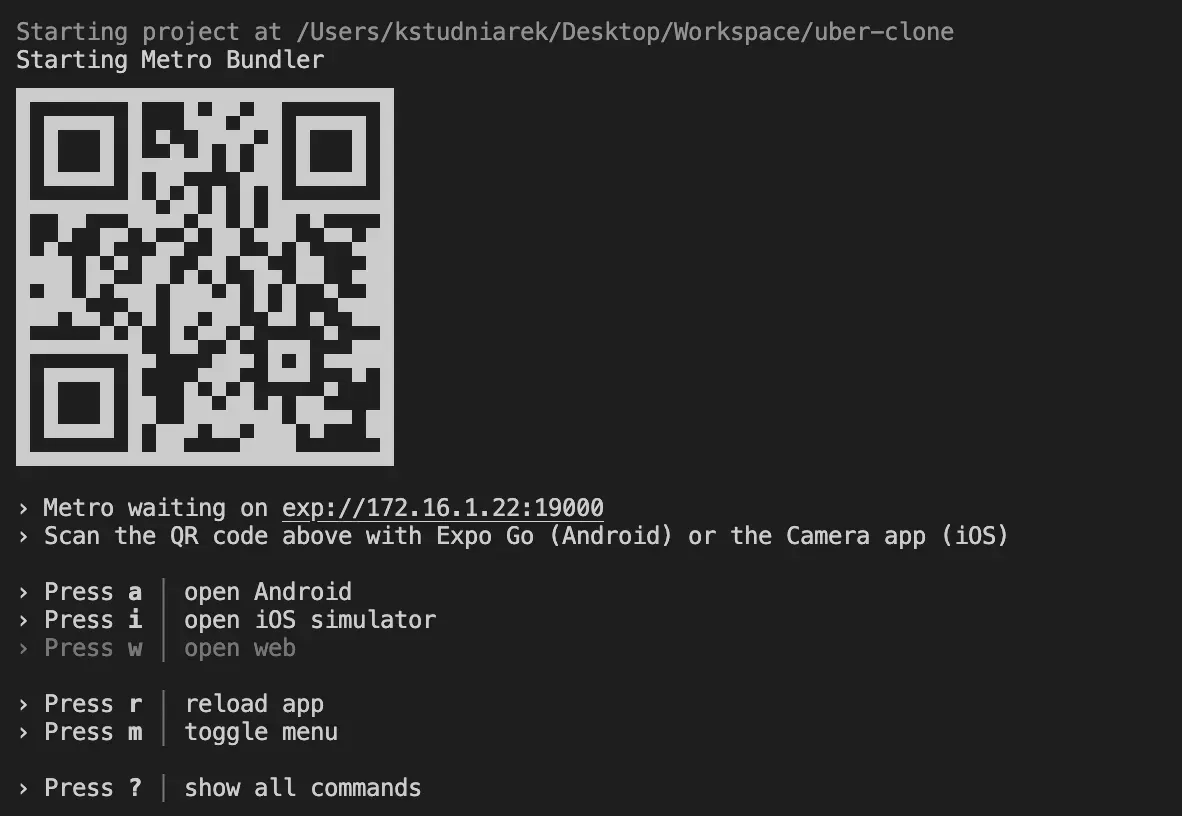
You should go to Play store if you’re an Android user or App store if you use iPhone and then install the Expo app.
Once you install the app, please run it and use the QR code scan feature to open your mobile app. At this moment, it should be a simple line of text in the middle of the screen saying:
Open up App.js to start working on your app!
Adding world map to customer app using Google Maps
The customer will place a new ride request to a specific location by placing a pin on a world map in the taxi booking app. To do so, he must have his local map displayed on the device. Luckily react-native has built-in support for Google Maps. Let’s check how to use it.
First, install the react-native-maps library in your project. We will use it to display our map.
$ yarn expo install react-native-mapsNow open your App.js file and import MapView
import MapView from 'react-native-maps';The last thing to do is to use the MapView component in our App () function.
// ...

export default function App() {
  return (
    <View style={styles.container}>
      <MapView style={styles.map}></MapView>
      <StatusBar style="auto" />
    </View>
  );
}

const styles = StyleSheet.create({
  ...
  map: {
    width: '100%',
    height: '100%',
  },
});
As you can see, we have replaced the Text component from our original app with MapView and added some styling to make our map fullscreen. So let’s run the application and check how it looks now!
We do have a map. However, now it does not show the user’s current location. To change it, we first need to get the location of the users’ device. For that, we will use the react-native-geolocation library.
$ yarn expo install @react-native-community/geolocation
Now let’s add the geolocation to our code. We will use the useEffect() hook to ask for geolocation permissions:
useEffect(() => {
    (async () => {
      let { status } = await Location.requestForegroundPermissionsAsync();
      if (status !== 'granted') {
        console.log('Permission to access location was denied');
        return;
      }
    })();
  }, []);
Now in the same hook, we need to pull the current user location and update the state:
useEffect(() => {
    (async () => {
      ...
      let location = await Location.getCurrentPositionAsync({});
      setPosition({
        latitude: location.coords.latitude,
        longitude: location.coords.longitude,
        latitudeDelta: 0.0922,
        longitudeDelta: 0.0421,
      });
    })();
  }, []);
The last thing to do is to set the location in the MapView react component. At this moment, our return function should look like this:
return (
    <View style={styles.container}>
      <MapView
        style={styles.map}
        initialRegion={position}
        region={position}></MapView>
      <StatusBar style="auto" />
    </View>
  );
Right now, the whole App.js file should look similar to the following snippet:
import { useState, useEffect } from 'react';
import { StatusBar } from 'expo-status-bar';
import { StyleSheet, View } from 'react-native';
import MapView from 'react-native-maps';
import * as Location from 'expo-location';
export default function App() {
const [position, setPosition] = useState({
latitude: 0,
longitude: 0,
latitudeDelta: 0.0922,
longitudeDelta: 0.0421,
});
useEffect(() => {
(async () => {
let { status } = await Location.requestForegroundPermissionsAsync();
if (status !== 'granted') {
console.log('Permission to access location was denied');
return;
}
let location = await Location.getCurrentPositionAsync({});
setPosition({
latitude: location.coords.latitude,
longitude: location.coords.longitude,
latitudeDelta: 0.0922,
longitudeDelta: 0.0421,
});
})();
}, []);
return (
<View style={styles.container}>
<MapView
style={styles.map}
initialRegion={position}
region={position}></MapView>
<StatusBar style="auto" />
</View>
);
}
const styles = StyleSheet.create({
container: {
flex: 1,
backgroundColor: '#fff',
alignItems: 'center',
justifyContent: 'center',
},
map: {
width: '100%',
height: '100%',
},
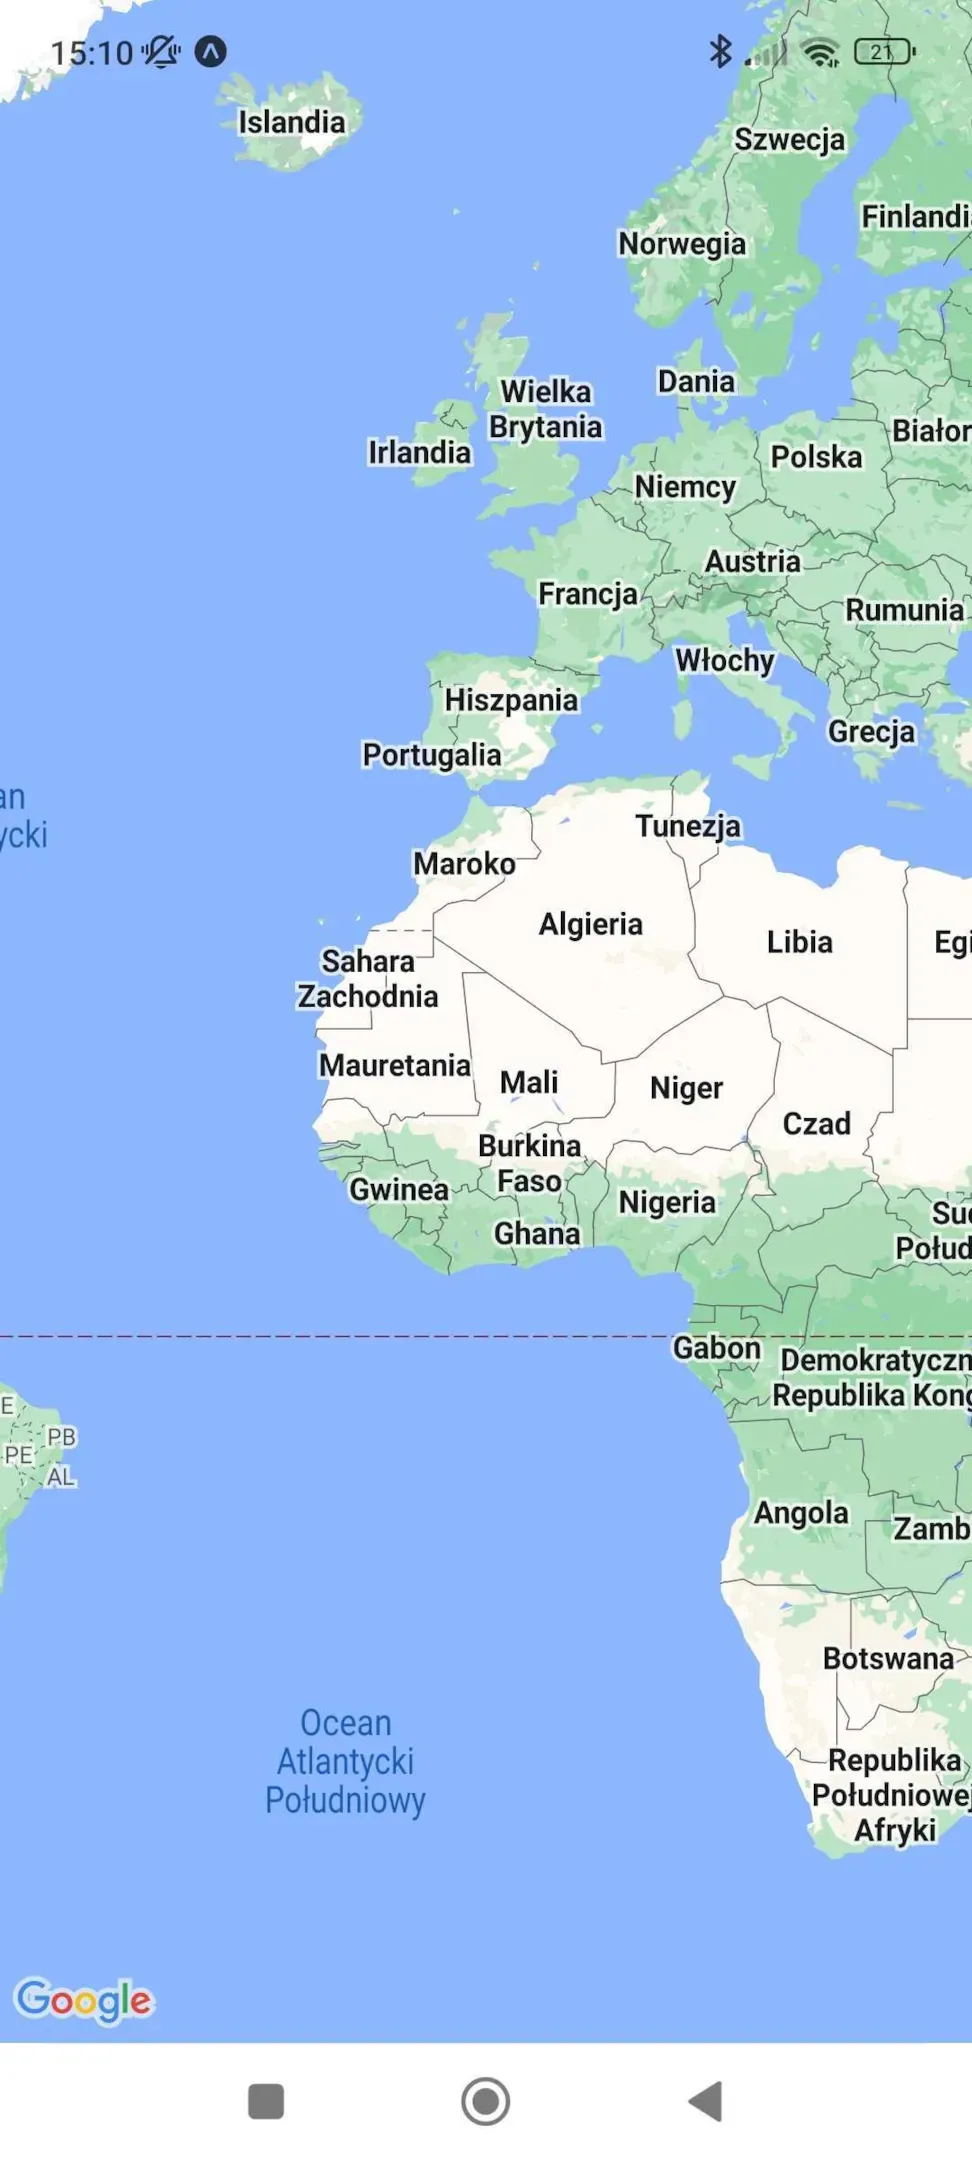
});After running this code with expo start command, you should see the full-screen map with your current location on your device.
Adding a dummy ride request function
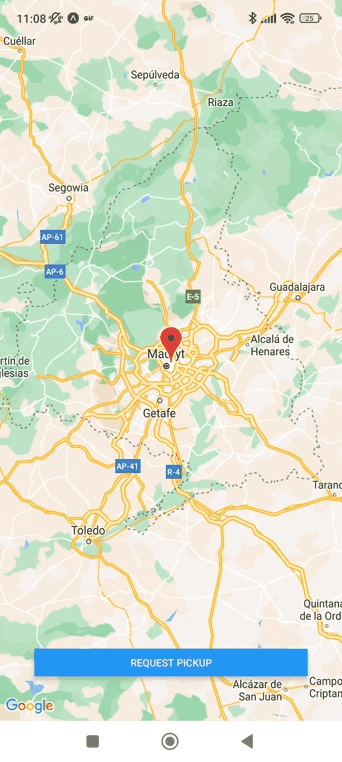
The next thing we should add to our mobile app is the ride request functionality. We will add a marker indicating the location in the center of the screen and a button at the bottom to submit the taxi booking.
Let’s start with the marker. Adding a simple pin should be pretty easy. You only need to add a Marker component inside our MapView component. Next, you should set the coordinate props to the position from our application state. At this moment, we will also set the tracksViewChanges prop to true. It simply means that our marker will re-render on the state change. At this point, our render function should look as follows:
return (
    <View style={styles.container}>
      <MapView
        style={styles.map}
        region={position}>
          <Marker
            coordinate={{
              latitude: position.latitude,
              longitude: position.longitude
            }}
            tracksViewChanges={true}>
            </Marker>
      </MapView>
      <StatusBar style="auto" />
    </View>
  );
Our goal is to make the marker always stay in the center of the map. At this moment, when you run the application, you will impliedly notice that marker stays at the starting position on the map and doesn’t move with it. To change that, we need to implement a function that will update our state whenever the user drags the map in any direction. The following code should do the work:
const onRegionChange = region => {
setPosition({
latitude: region.latitude,
longitude: region.longitude,
latitudeDelta: region.latitudeDelta,
longitudeDelta: region.longitudeDelta,
})
}
return (
<MapView
style={styles.map}
region={position}
onRegionChangeComplete={onRegionChange}>
</MapView>
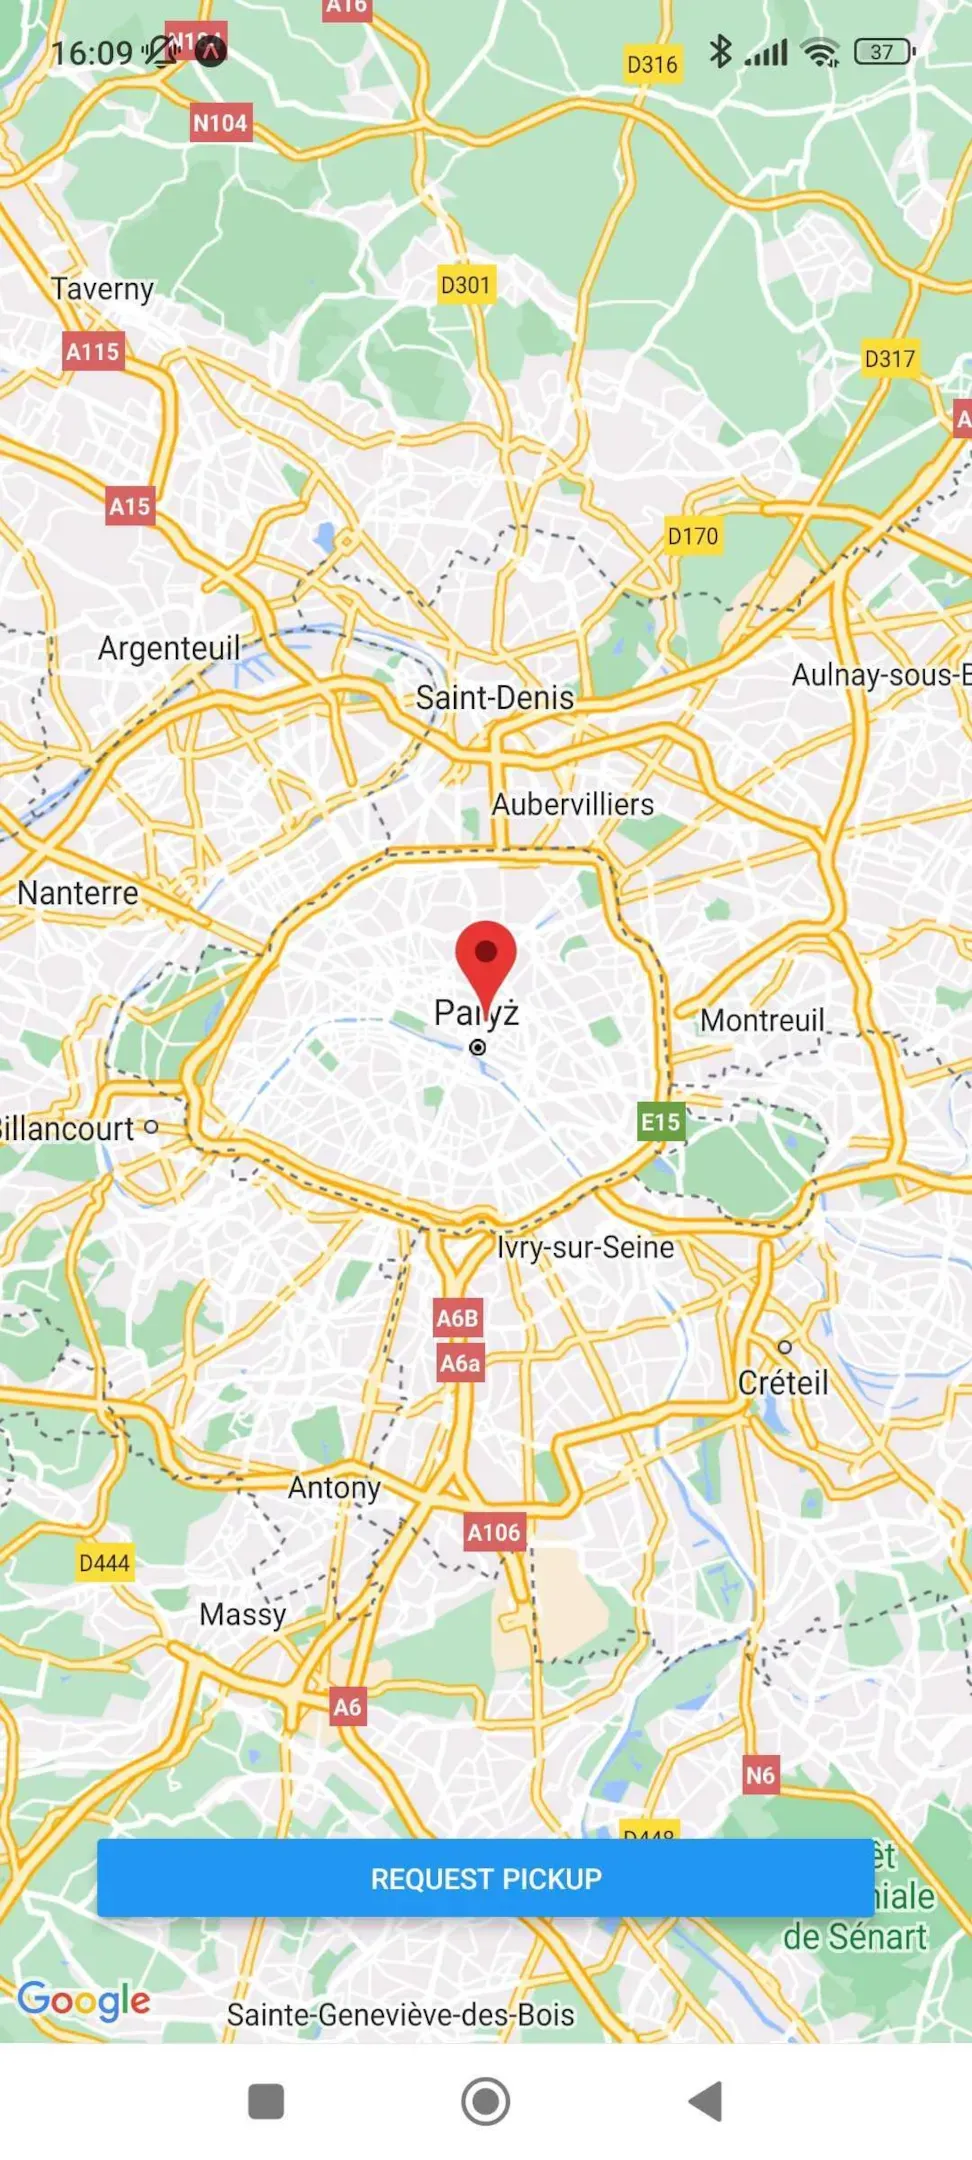
);A marker should be centered on the map, even when the user changes the displayed region.

The last interface element we need to implement is the button we will use later to send new ride requests to the backend API. We can do it by adding the button component and styling it at the bottom of the screen. To do so, let’s change our return function.
return (
    <View style={styles.container}>
      <MapView
        style={styles.map}
        region={position}
        onRegionChangeComplete={onRegionChange}>
          <Marker
            coordinate={{
              latitude: position.latitude,
              longitude: position.longitude
            }}
            tracksViewChanges={true}>
            </Marker>
      </MapView>
      <View style={styles.pickupButton}>
        <Button title="Request pickup"/>
      </View>
      <StatusBar style="auto" />
    </View>
  );
The style sheet should look like this:
const styles = StyleSheet.create({
  pickupButton:{
    position: 'absolute',
    top: '90%',
    alignSelf: 'center',
    width: '80%'
  }
});
We finished our user interface. After running our Uber clone app, you should see the following screen.
Implementing backend API and admin dashboard for Uber app clone
To provide the full taxi booking functionality, we need to send the ride request to a backend server and display it in the admin panel. To do so, we need to prepare the following:
- a database to store ride requests,
- a backend API for the mobile app,
- an admin panel so the admin can see all the requests.
For the sake of this tutorial, we will use PostgreSQL as a database and AdminJS as a backend API and admin panel. Setting a local database should be as simple as installing pgAdmin, or creating an accessible database on ElephantSQL. So, instead, let’s move on to the preparation of our backend API and admin panel.
Preparing admin panel
As mentioned above, we will use AdminJS both as our admin panel and as an API for our mobile app. It is a powerful admin panel that provides all of our required functionalities. To start building, let’s create a new project.
$ mkdir ../uber-clone-backendWhen we have the new directory created, we can install AdminJS. Use the following command:
$ yarn add adminjs @adminjs/express @adminjs/typeorm
This command will install all the dependencies required to run the AdminJS panel as an Express service. We have also added the TypeORM dependencies since we will later use them to connect to the database.
We will also need to install express dependencies.
$ yarn add express tslib express-formidable express-session
Since we’re using TypeScript, the last thing we need to add as a dev dependency are types for express.
$ yarn add -D @types/express ts-node
Now we can start building. The first thing we should create is the App.ts file. The following twenty lines from the AdminJS documentation should initialize the express application and create an empty admin panel.
import AdminJS from 'adminjs'
import AdminJSExpress from '@adminjs/express'
import express from 'express'

const PORT = 3000

const start = async () => {
  const app = express()
  const admin = new AdminJS({})
  const adminRouter = AdminJSExpress.buildRouter(admin)
  app.use(admin.options.rootPath, adminRouter)
  app.listen(PORT, () => {
    console.log(`AdminJS started on http://localhost:${PORT}${admin.options.rootPath}`)
  })
}

start()
Let’s run this code using the following command:
$ ts-node appAfter visiting http://localhost:3000/admin you should see an empty admin panel.

Our next move would be connecting this admin panel to our database. We have already installed dependencies for TypeORM. It is a simple TypeScript object-relational mapping library that will help us establish the database contract. Since we already have all the libraries in our project, let’s move on to entity implementation. For that, let’s make a new folder for storing our entities definition:
$ mkdir entities
Now let’s create a new ride.entity.ts file in our entities folder. It will be the description of the ride object from the database. For now, it will consist only of three fields: id, latitude, and longitude. The code should look as follows:
import { BaseEntity, Column, Entity, PrimaryGeneratedColumn } from 'typeorm'

@Entity({ name: 'rides' })
export class Ride extends BaseEntity {
  @PrimaryGeneratedColumn()
  public id: number;
  @Column({type: 'float'})
  public long: number;
  @Column({type: 'float'})
  public lat: number;
}
The next step would be creating the data-source.ts file, where we will describe the database connection:
import { DataSource } from "typeorm";
import { Ride } from "./entities/ride.entity.js";

export default new DataSource({
    type: "postgres",
    host: "localhost",
    port: 5432,
    username: [YOUR DATABASE USERNAME],
    password: [YOUR DATABASE PASSWORD],
    database: "postgres",
    synchronize: true,
    logging: true,
    entities: [Ride],
    subscribers: [],
    migrations: [],
})
In the data-source.ts file, we indicated the host, port, and entities. From that, TypeOrm knows where to look for the data. You should replace all the data in this file to reflect your database setup. Don’t forget to replace the username and password fields in particular!
The last thing to do is to show AdminJS where to look for the data. Finally, we need to import all required components. We will use @adminjs/typeorm plugin, together with our data-source.ts file and Ride entity.
import * as AdminJSTypeorm from '@adminjs/typeorm'

import dataSource from './data-source.js'
import { Ride } from './entities/ride.entity.js'
Then we should register the adapter so AdminJS knows which adapter we are going to use:
AdminJS.registerAdapter({
  Resource: AdminJSTypeorm.Resource,
  Database: AdminJSTypeorm.Database,
})
The last thing we need to do is to alter the start function to initialize the data source and add it to the admin panel.
const start = async () => {
// ...
await dataSource.initialize()
const adminOptions = {
resources: [Ride],
}
const admin = new AdminJS(adminOptions)
// ...
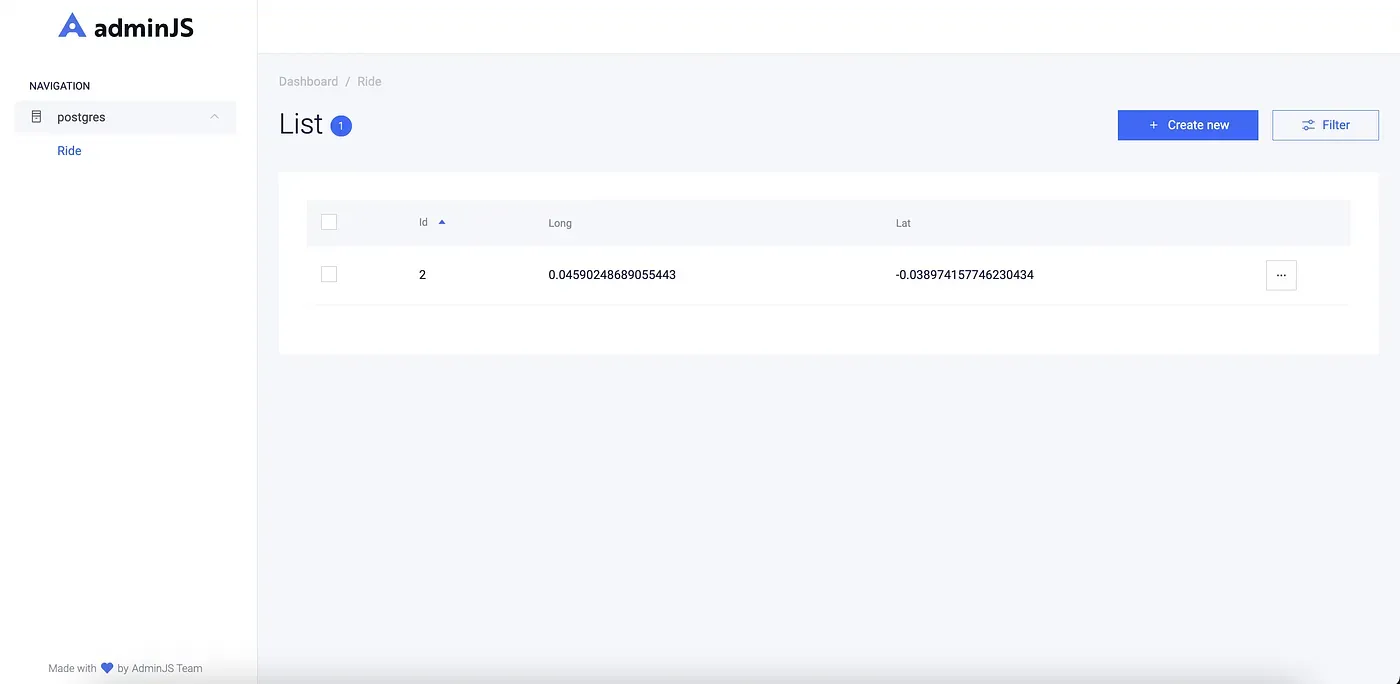
}After running the application, you should see the navigation menu with the Ride option. After choosing it, you should be able to list, create and edit ride records from the level of the admin panel. TypeOrm should also create a rides table in your database.
At this moment, your app.js file should look as follows:
import AdminJS from 'adminjs'
import AdminJSExpress from '@adminjs/express'
import express from 'express'
import * as AdminJSTypeorm from '@adminjs/typeorm'

import dataSource from './data-source.js'
import { Ride } from './entities/ride.entity.js'

AdminJS.registerAdapter({
  Resource: AdminJSTypeorm.Resource,
  Database: AdminJSTypeorm.Database,
})

const PORT = 3000

const start = async () => {
  const app = express()
  await dataSource.initialize()
  const adminOptions = {
    resources: [Ride],
  }
  const admin = new AdminJS(adminOptions)
  const adminRouter = AdminJSExpress.buildRouter(admin)
  app.use(admin.options.rootPath, adminRouter)
  app.listen(PORT, () => {
    console.log(`AdminJS started on http://localhost:${PORT}${admin.options.rootPath}`)
  })
}

start()
Using AdminJS API
We have the admin panel running. Now we should test out if our API works. AdminJS exposes the API for every resource and action in the library. There are six actions we can choose from:
- list is responsible for listing records under a resource, as well as filtering them;
- search allows you to search records in a given resource by a query string (by default, it’s the title property);
- new is responsible for creating a new record in a resource;
- show is responsible for showing the details of a record;
- edit allows you to modify a specified record;
- delete is accountable for deleting single records.
This tutorial will use a new action API to create a record in the ride table whenever the user pushes a new request. In our case, the new action API will expect a post-call with the long and lat variables in the payload. You can use Postman or any other free tools to create a request. The URL we will send our request to is: http://localhost:3000/admin/api/resources/Ride/actions/new
Notice that AdminJS exposes the API under /api path. As mentioned above, you should put artificial long and lat values to the request’s body and send it.
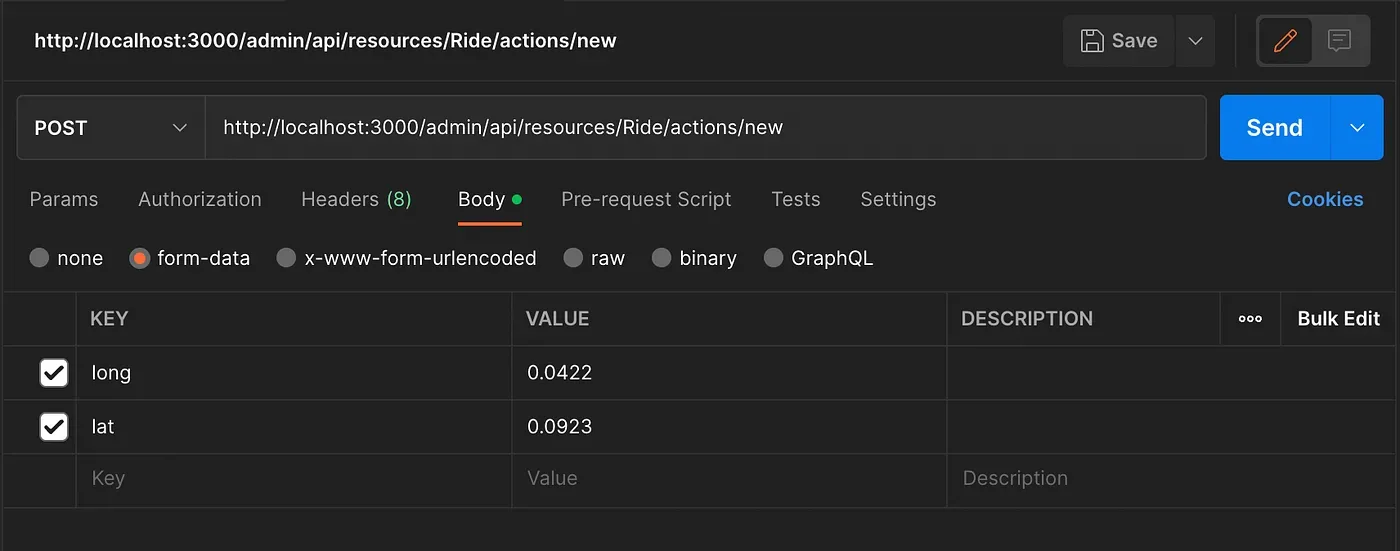
As a result of this request, a new record appears in the database, and we should receive the following message.
{
    "redirectUrl": "/admin/resources/Ride",
    "notice": {
        "message": "Successfully created a new record",
        "type": "success"
    },
    "record": {
        "params": {
            "long": "0.0422",
            "lat": "0.0923",
            "id": 1
        },
    }
}
Our API is working correctly. So, let’s move on to connect all the bricks!
Connecting an Uber clone app with admin panel
So far, we have implemented the mobile app and the backend API together with a simple admin panel. To fully implement the Uber clone app, we need to send the ride request from the mobile app directly to our backend. Let’s come back to our mobile app project.
We will use the axios library to send the post request to the backend. Additionally, we will need to add form-data to our project to build the request body. To do so, run this command in your mobile app project directory:
$ yarn add axios form-dataNow move on to your App.js file and add the following imports:
import axios from 'axios';
import FormData from 'form-data';
We will also need to implement a simple function to send the ride requests directly to our backend API.
const pushRideRequest = async () => {
    const rideFormData = new FormData();
    rideFormData.append('long', position.longitude);
    rideFormData.append('lat', position.latitude);

    try{
      const response = await axios({
        method: "post",
        url: "http://[YOUR_LOCAL_IP]:3000/admin/api/resources/Ride/actions/new",
        data: rideFormData,
        headers: {
          "content-type": "multipart/form-data",
          "ngrok-skip-browser-warning": "69420",
        },
      })
      Alert.alert(
        "Ride request sent",
        "Your ride request has been sent.",
        [
          { text: "OK", onPress: () => console.log("OK Pressed") }
        ]
      );
    } catch(error){
      console.log(error)
    }
}
In the first lines, we prepare the FormData object with longitude and latitude taken directly from status. Then we send the post request using axios and display the alert on successful ride request submission.
To make this code work, you will have to replace the [YOUR_LOCAL_IP] with your broadcast IP (unfortunately, localhost will not work because of expo and Android restrictions). Hopefully, finding your local IP is as simple as typing this command:
$ ifconfig | grep broadcast
You should receive the following line, where in the place of [YOUR_LOCAL_IP] will be the IP address you should use.
$ inet [YOUR_LOCAL_IP] netmask 0xffffff00 broadcast 1.1.1.1
When we implemented the request posting function, we only needed to connect it with a button. So, we will use the onPress prop of the button we have previously implemented for that job.
return (
    <View style={styles.container}>
      <View style={styles.pickupButton}>
        <Button title="Request pickup" onPress={pushRideRequest}/>
      </View>
    </View>
  );
At this moment, your complete mobile app code should look as follows:
import { useState, useEffect } from 'react';
import { StatusBar } from 'expo-status-bar';
import { StyleSheet, View, Button, Alert } from 'react-native';

import MapView from 'react-native-maps';
import * as Location from 'expo-location';
import axios from 'axios';
import FormData from 'form-data';
import { Marker } from 'react-native-maps';
export default function App() {

  const [position, setPosition] = useState({
    latitude: 0,
    longitude: 0,
    latitudeDelta: 0.0922,
    longitudeDelta: 0.0421,
  });

  const pushRideRequest = async () => {

    const rideFormData = new FormData();
    rideFormData.append('long', position.longitude);
    rideFormData.append('lat', position.latitude);

    try{
      const response = await axios({
        method: "post",
        url: "http://192.168.8.134:3000/admin/api/resources/Ride/actions/new",
        data: rideFormData,
        headers: {
          "content-type": "multipart/form-data",
          "ngrok-skip-browser-warning": "69420",
        },
      });

      Alert.alert(
        "Ride request sent",
        "Your ride request has been sent.",
        [
          { text: "OK", onPress: () => console.log("OK Pressed") }
        ]
      );

    } catch(error){
      console.log(error)
    }
  }

  const onRegionChange = region => {
    setPosition({
      latitude: region.latitude,
      longitude: region.longitude,
      latitudeDelta: region.latitudeDelta,
      longitudeDelta: region.longitudeDelta,
    })
  }

  useEffect(() => {
    (async () => {
      let { status } = await Location.requestForegroundPermissionsAsync();
      if (status !== 'granted') {
        console.log('Permission to access location was denied');
        return;
      }
      let location = await Location.getCurrentPositionAsync({});
      setPosition({
        latitude: location.coords.latitude,
        longitude: location.coords.longitude,
        latitudeDelta: 0.0922,
        longitudeDelta: 0.0421,
      });
    })();
  }, []);

  return (
    <View style={styles.container}>
      <MapView
        style={styles.map}
        region={position}
        onRegionChangeComplete={onRegionChange}>
          <Marker
            coordinate={{
              latitude: position.latitude,
              longitude: position.longitude
            }}
            tracksViewChanges={true}>
            </Marker>
      </MapView>
      <View style={styles.pickupButton}>
        <Button title="Request pickup" onPress={pushRideRequest}/>
      </View>
      <StatusBar style="auto" />
    </View>
  );
}

const styles = StyleSheet.create({
  container: {
    flex: 1,
    backgroundColor: '#fff',
    alignItems: 'center',
    justifyContent: 'center',
  },
  map: {
    width: '100%',
    height: '100%',
  },
  pickupButton:{
    position: 'absolute',
    top: '90%',
    alignSelf: 'center',
    width: '80%'
  }
});
We have built our entire system. After running this code and the AdminJS admin panel we implemented in the previous section, you should be able to request a ride by pressing the button on the mobile app. The request will be sent to the backend API and saved in the database. Then the admin can see the ride details in the admin panel.
Further steps
We’ve built only part of the uber clone app functionalities in this tutorial. At this moment, your user can book rides instantly through the mobile app, and your admin can see the incoming pickup requests. However, there is still a lot to do to make the taxi booking business idea a reality. You will need to implement the whole taxi driver app. It would be nice to extend the admin panel so that the admin can see the location on the map, not as plain coordinates. You should also take care of security, collecting the contact details, payment gateway, keeping track of all the trips, their statuses and vehicle type as well as all the details related to ride history for your users and taxi drivers.
Starting a taxi business is not easy, but I hope that this tutorial gives a solid understanding of how to approach building location based services. Then, to move on with your project and create a more robust taxi app, you can follow the documentation of AdminJS and react-native. You’re also welcome to join the AdminJS Slack community to get technical support on the issues you might encounter. Last but not least, if you’re looking for a place to host a backend for your mobile apps, then look at AdminJS Cloud.
