
According to FinancesOnline, the world will produce and consume 94 zettabytes of data by the end of 2022. With the amount rapidly growing each year (estimated at 74 zettabytes in 2021 and 118 zettabytes in the coming year), more and more businesses see the benefits of storing and analyzing operational data with custom CRM (client relationship management) solutions. If you own a bike shop, you aren’t an exception — virtually any business can benefit from its own CRM.
Building custom CRM software doesn’t have to be complicated. What AdminJS brings to the table is a quick and easy way to set up a dedicated system that allows you to take care of your clients and their needs using the collected data, taking your customer experience (CX) to the next level. That chain on John’s race bike might look fine at first glance, but with a quick search through the custom CRM system built with AdminJS you’ll know right away the last time it was replaced was over 2 years ago!
In this article, we explain how to build a simple CRM system for a small business with AdminJS. Let’s get started!
Custom CRM development: Whats and Whys
A custom CRM solution will connect all of your data sources about your customers in a way that allows you to meet (and even exceed!) their expectations, while providing analytical insight to help close deals and estimate revenue growth.
To build a custom CRM software, we’ll need the following tools:
- Express framework — it’s almost as quick and easy to set up as AdminJS;
- MongoDB — for its great Object Data Modeling library (Mongoose) and performance;
- AdminJS — we want to make sure that adding or accessing the data is just a few clicks away;
- Docker — it’ll come in handy when setting up the database;
Setting up MongoDB
First, let’s make sure we’ve got a database with customer data to connect to. Head over to the Docker documentation to see how to download and install the Docker desktop app. Once installed, navigate to your app directory and create a stack.yml file that contains information about our example database.
version: '3.1'

services:

  mongo:
    image: mongo
    restart: always
    ports:
      - 27017:27017
    environment:
      MONGO_INITDB_ROOT_USERNAME: root
      MONGO_INITDB_ROOT_PASSWORD: example
With the file created, you can turn to your terminal and use docker-compose to bring the database to life.
docker-compose -f up
From now on the database will be accessible at localhost:27017.
Setting up AdminJS
There are a couple of things we need to take care of before we set up our AdminJS instance for your custom CRM software.
Here is an overview of the project directory.
├── src
│   ├── actions
│   ├── admin
│   │   ├── componentLoader.ts
│   │   ├── components
│   │   │   └── jobOrder.tsx
│   │   ├── index.ts
│   │   ├── locale
│   │   │   ├── appointment.json
│   │   │   └── index.ts
│   │   ├── resources
│   │   │   ├── appointment.resource.ts
│   │   │   ├── bike.resource.ts
│   │   │   └── customer.resource.ts
│   │   └── types
│   │       └── createResourceResult.ts
│   ├── app.ts
│   └── models
│       ├── appointment.model.ts
│       ├── bike.model.ts
│       └── customer.model.ts
├── package.json
├── tsconfig.json
└── yarn.lock
First, navigate through the terminal to your project’s directory and initialize a yarn project.
yarn init
The CLI is going to ask you a couple of basic questions. You can fill them in as you please, however, keep in mind the entry point should be left unchanged for the sake of this article.
question name (default):
question version (1.0.0):
question description:
question entry point (index.js): src/app.ts
question repository url:
question author:
question license (MIT):
question private:
Once you’re done with the questions, a ‘package.json’ file will appear.
We’re going to add a script to run our AdminJS instance. Open the ‘package.json’ file. Add the following just underneath the ‘license’ key:
"scripts": {
    "dev": "ts-node ./src/app"
  }
Next, let’s install and configure TypeScript.
yarn -D add typescript
yarn tsc --init
Once the tsconfig.json has been created, open it in your favorite code editor and configure it as follows:
{
  "compilerOptions": {
    "incremental": true,                              /* Save .tsbuildinfo files to allow for incremental compilation of projects. */
    "target": "es2017",                                  /* Set the JavaScript language version for emitted JavaScript and include compatible library declarations. */
    "jsx": "react",                                /* Specify what JSX code is generated. */
    "experimentalDecorators": true,                   /* Enable experimental support for TC39 stage 2 draft decorators. */
    "emitDecoratorMetadata": true,                    /* Emit design-type metadata for decorated declarations in source files. */
    "jsxFactory": "",                                 /* Specify the JSX factory function used when targeting React JSX emit, e.g. 'React.createElement' or 'h'. */
    "jsxFragmentFactory": "",                         /* Specify the JSX Fragment reference used for fragments when targeting React JSX emit e.g. 'React.Fragment' or 'Fragment'. */

    /* Modules */
    "module": "commonjs",                                /* Specify what module code is generated. */
    "baseUrl": "./",                                  /* Specify the base directory to resolve non-relative module names. */
    "resolveJsonModule": true,                        /* Enable importing .json files. */
    "allowJs": true,                                  /* Allow JavaScript files to be a part of your program. Use the 'checkJS' option to get errors from these files. */

    /* Interop Constraints */
    "allowSyntheticDefaultImports": true,             /* Allow 'import x from y' when a module doesn't have a default export. */
    "esModuleInterop": true,                             /* Emit additional JavaScript to ease support for importing CommonJS modules. This enables 'allowSyntheticDefaultImports' for type compatibility. */

    /* Completeness */
    "skipLibCheck": true                                 /* Skip type checking all .d.ts files. */
  },
  "exclude": [
    "node_modules",
  ],
  "include": [
    "**/src/**/*.ts",
    "**/src/**/*.tsx",
    "**/src/**/*.jsx",
    "**/src/**/*.js",
    "**/test/**/*.*.ts"
  ]
}
Now, onto the core dependencies.
yarn add adminjs
yarn add mongoose
yarn add express tslib express-formidable express-session
yarn add @adminjs/express
yarn add @adminjs/mongoose
yarn add -D @types/express
With everything set up and ready, let’s start creating files and adding some code.
First, let’s prepare a folder called ‘src’ inside which we’ll create another folder called ‘admin’ and a file ‘index.ts’ that will serve as a general configuration file for AdminJS.
import AdminJS, { AdminJSOptions } from "adminjs";
import * as AdminJSMongoose from "@adminjs/mongoose";

AdminJS.registerAdapter({
  Database: AdminJSMongoose.Database,
  Resource: AdminJSMongoose.Resource,
});

export const mongooseMenu = {
  name: "Service",
  icon: "Bicycle",
};
export const generateAdminJSConfig = (): AdminJSOptions => ({
  rootPath: "/bikes",
  branding: {
    companyName: "VeloStore",
  },
  resources: [],
});
We’re doing a couple of things here. First, we’re registering a Mongoose adapter, then we’re creating a menu item called ‘Service’ and letting AdminJS know to be available under ‘/bikes’. We’ll add resources here too, once we’ve got them ready.
With the configuration file created, we can go ahead and go back to the ‘src’ directory and create our entry point file ‘app.ts’.
import AdminJS from 'adminjs';
import mongoose from 'mongoose';
import AdminJSExpress from '@adminjs/express';
import express from 'express';
import { generateAdminJSConfig } from './admin.js';

const PORT = 3000;

const start = async (): Promise<void> => {
  const app = express();
  const config = generateAdminJSConfig();
  await mongoose.connect('mongodb://root:example@0.0.0.0:27017/');

  const admin = new AdminJS(config);
  if (process.env.NODE_ENV === 'production') {
    await admin.initialize();
  } else admin.watch();
  const adminRouter = AdminJSExpress.buildRouter(admin);
  app.use(admin.options.rootPath, adminRouter);

  app.listen(PORT, async () => {
    console.log(`AdminJS is under localhost:${PORT}/${admin.options.rootPath}`);
  });
};

start();
Earlier we set up MongoDB, which should be accessible at localhost:27017. This snippet will make sure our app connects to it.
However, keep in mind that our AdminJS instance will be available at localhost:3000/bikes.
Next, inside the ‘src’ folder create a ‘models’ folder and a ‘customer.model.ts’ file. This file will serve three purposes: it will hold our TypeScript interface for the MongoDB documents; it will also take care of our Mongoose schema and serve as the basis for AdminJS resource (which we will tackle shortly).
We want to make sure that the customer is easily identifiable, either through the email address or phone number. Each customer should be able to own multiple bikes, hence we’re referencing another model called ‘Bike’.
import { model, Schema, Types } from "mongoose";

export interface Customer {
  firstName: string;
  lastName: string;
  email: string;
  phone: number;
  bike: Types.ObjectId[];
}

export const CustomerSchema = new Schema<Customer>({
  firstName: { type: String, required: true },
  lastName: { type: String, required: true },
  email: { type: String, required: false },
  phone: { type: Number, required: true, unique: true },
  bike: [{ type: Types.ObjectId, ref: "Bike" }],
});

export const CustomerModel = model<Customer>("Customer", CustomerSchema);
Now that the customer is set up, let’s move on to the bike model file. Inside the ‘models’ directory create a ‘bike.model.ts’ file.
import { model, Schema, Types } from "mongoose";

export interface Bike {
  color: string;
  bike: string;
  atService: boolean;
  appointment: Types.ObjectId[];
}

export const BikeSchema = new Schema<Bike>({
  color: { type: String, required: true },
  bike: { type: String, required: [true, "Bike needs a name!"] },
  atService: { type: Boolean, required: true, default: false },
  appointment: [{ type: Schema.Types.ObjectId, ref: "Appointment" }],
});

export const BikeModel = model<Bike>("Bike", BikeSchema);
Then, as our last model, we’re going to create an appointment model. Inside the same directory create an ‘appointment.model.ts’ file.
import { model, Schema, Types } from "mongoose";

export interface Appointment {
  date: Date;
  firstRepair: string;
  secondRepair: string;
  thirdRepair: string;
  fourthRepair: string;
  done: boolean;
  bike: Types.ObjectId;
  customer: Types.ObjectId;
}

export const AppointmentSchema = new Schema<Appointment>({
  date: {
    type: Date,
    validate: [
      function () {
        return new Date();
      },
    ],
  },
  firstRepair: { type: String, required: false },
  secondRepair: { type: String, required: false },
  thirdRepair: { type: String, required: false },
  fourthRepair: { type: String, required: false },
  done: { type: Boolean, required: false, default: false },
  bike: { type: Schema.Types.ObjectId, ref: "Bike" },
  customer: { type: Schema.Types.ObjectId, ref: "Customer" },
});

export const AppointmentModel = model<Appointment>(
  "Appointment",
  AppointmentSchema
);
In this case, we’ll be using the date and time as the job order number and adding more information to it from both the customer and bike documents.
To create our resources, we’ll need to create a TypeScript interface for them. Go ahead and create a ‘types’ folder in your ‘admin’ directory. Inside create a ‘createResourceResult.ts’ file.
import { ResourceOptions, FeatureType } from "adminjs";

export interface CreateResourceResult<T> {
  resource: T;
  options: ResourceOptions;
  features?: FeatureType[];
}
Head to a directory one level higher (‘src’) and create a folder called ‘resources’. Each file here is where we’ll initialize AdminJS resources from the Mongoose models we’ve already created.
First, create a file called ‘customer.resource.ts’.
import { CustomerModel } from "../../models/customer.model.js";
import { CreateResourceResult } from "../types/createResourceResult.js";
import { mongooseMenu } from "../index.js";

export const CreateCustomerResource = (): CreateResourceResult<typeof CustomerModel> => ({
  resource: CustomerModel,
  options: {
    navigation: mongooseMenu,
    properties: {
      email: {
        isTitle: true,
      },
      _id: {
        isVisible: false,
      },
      bike: {
        isArray: true,
      },
    },
  },
});
There are a couple of settings we need to add here. We’re hiding the MongoID parameter, as it won’t be that useful in the GUI.
Next, we’ll create a ‘bike.resource.ts’ file.
import { BikeModel } from "../../models/bike.model.js";
import { CreateResourceResult } from "../types/createResourceResult.js";
import { mongooseMenu } from "../index.js";

export const CreateBikeResource = (): CreateResourceResult<typeof BikeModel> => ({
  resource: BikeModel,
  options: {
    navigation: mongooseMenu,
    properties: {
      bike: {
        isTitle: true,
      },
      _id: {
        isVisible: false,
      },
    },
  },
});
The last resource we need to create is ‘appointment.resource.ts’.
import { AppointmentModel } from "../../models/appointment.model.js";
import { CreateResourceResult } from "../interfaces/createResourceResult.js";
import { mongooseMenu } from "../index.js";

export const CreateAppointmentResource = (): CreateResourceResult<typeof AppointmentModel> => ({
  resource: AppointmentModel,
  options: {
    navigation: mongooseMenu,
    properties: {
      date: {
        isTitle: true,
      },
      _id: {
        isVisible: false,
      },
    },
  },
});
With all the resources ready, we can head back to the configuration file ‘admin/index.ts’ and add our resources to the ‘generateAdminJSConfig()’ function.
export const generateAdminJSConfig = (): AdminJSOptions => ({
  locale,
  rootPath: "/bikes",
  branding: {
    companyName: "VeloStore",
  },
  resources: [
    CreateCustomerResource(),
    CreateBikeResource(),
    CreateAppointmentResource(),
  ],
});
At this point, you can safely run the app by navigating to the root directory of the app and running the ‘dev’ command.
yarn run dev
Our AdminJS instance is available at localhost:3000/bikes.
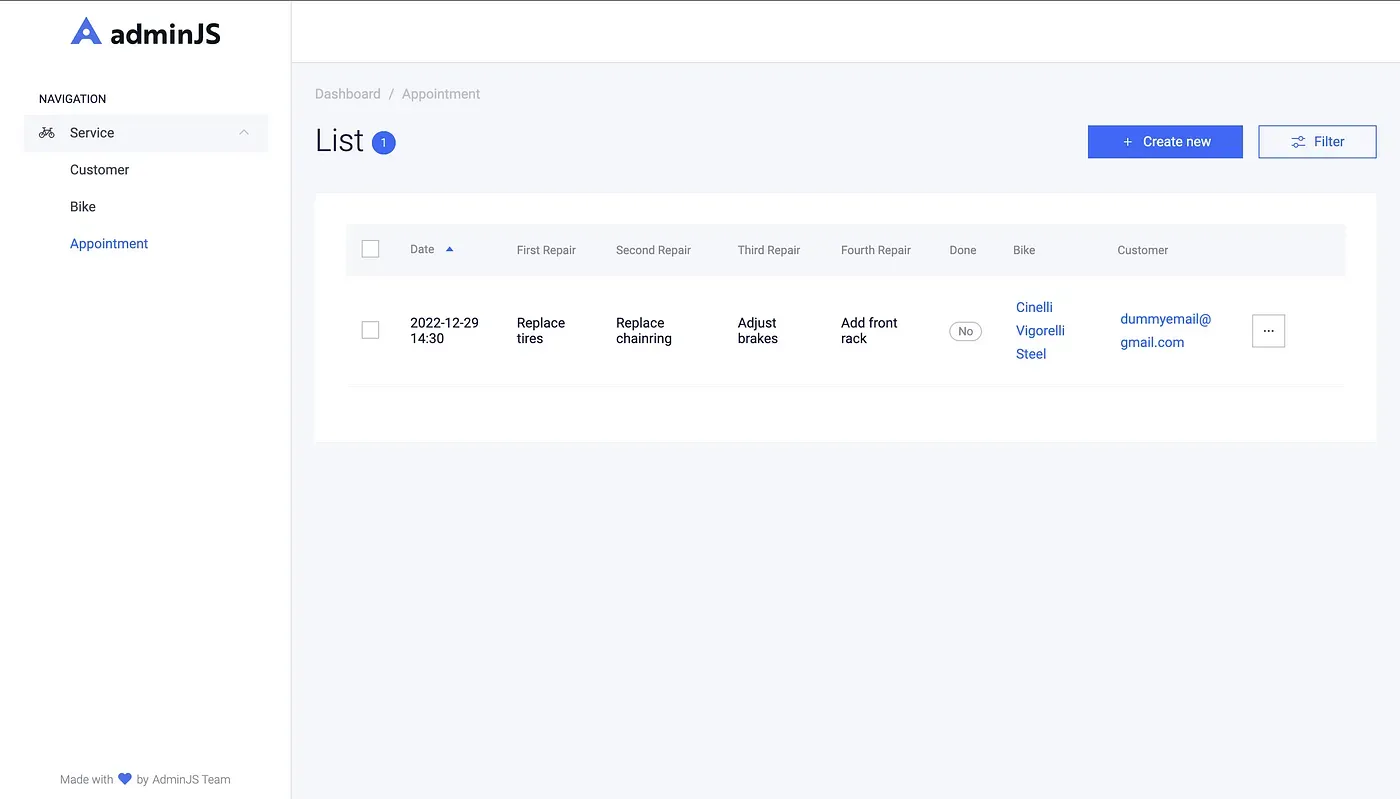
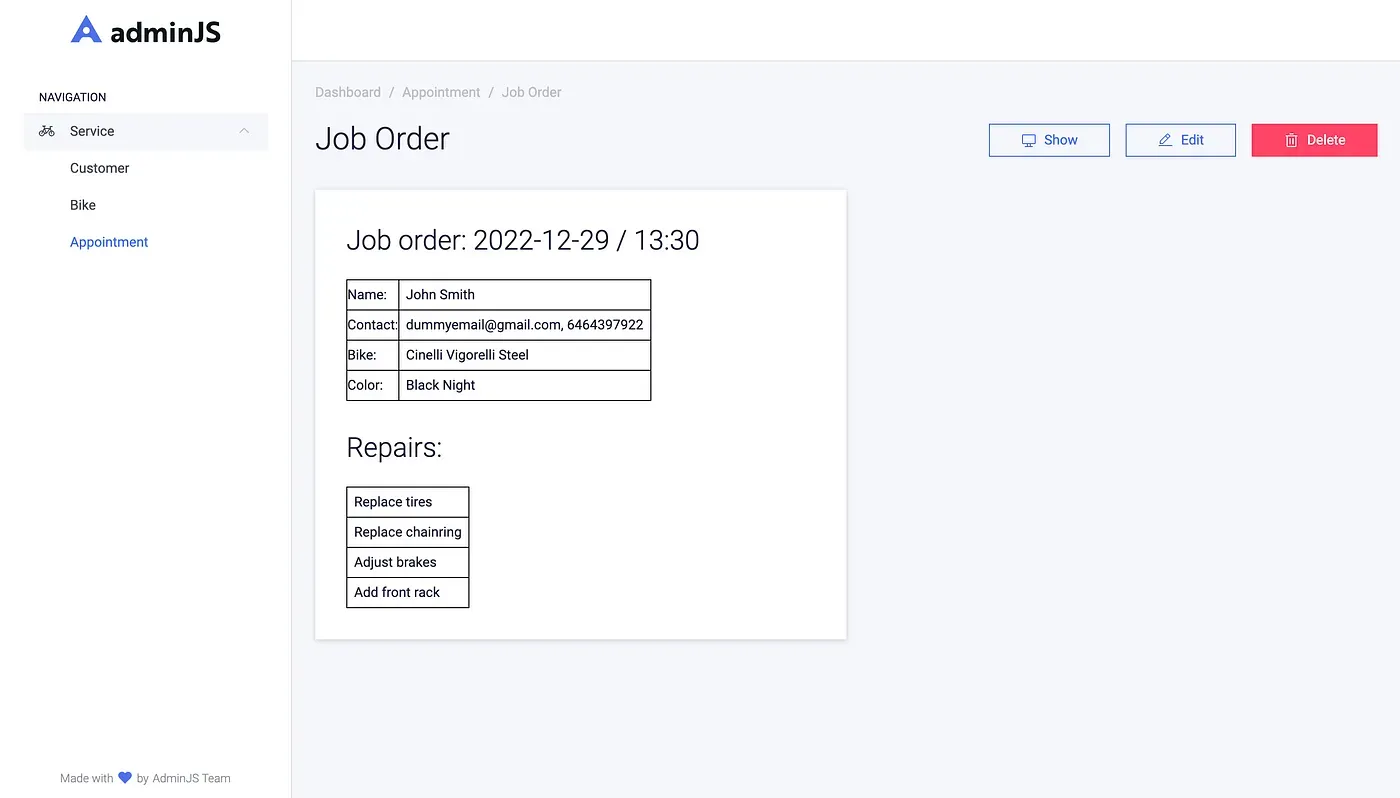
Custom CRM system component
The last functionality that we’re going to implement into our custom CRM software is a component that generates a job order from an appointment.
Let’s start by navigating to ‘src/admin’ where we’ll create a file named ‘componentLoader.ts’.
import { ComponentLoader } from 'adminjs';

const componentLoader = new ComponentLoader();

const Components = {
  ShowJobOrder: componentLoader.add('SHOW_JOB_ORDER', 'components/JobOrder.tsx'),
};
Next, we need to create a ‘components’ folder inside which we’ll create a file ‘jobOrder.tsx’.
export { componentLoader, Components };import React from 'react';
import { Box, H3 } from '@adminjs/design-system';
import { BasePropertyProps } from 'adminjs';

const ShowJobOrder = (props: BasePropertyProps) => {
  const { record } = props;
  return (
    <Box flex>
      <Box variant="white" width={1 / 2} boxShadow="card" mr="xxl" flexShrink={0}>
        <H3>Job order: {JSON.stringify(record.params.date).split("").slice(1, 11)}{" "}
          / {JSON.stringify(record.params.date).split("").slice(12, 17)}</H3>
        <style>{`table td, tr { border: 1px solid black; padding: 7px}`}</style>
        <table>
          <tr>
            Name:{' '}
            <td>
              {record.populated.customer?.params.firstName} {record.populated.customer?.params.lastName}
            </td>
          </tr>
          <tr>
            Contact:{' '}
            <td>
              {record.populated.customer?.params.email}
              {', '}
              {record.populated.customer?.params.phone}
            </td>
          </tr>
          <tr>
            Bike: <td>{record.populated.bike?.params.bike}</td>
          </tr>
          <tr>
            Color: <td>{record.populated.bike?.params.color}</td>
          </tr>
        </table>
        <H3>Repairs:</H3>
        <style>{`table tr { border: 1px solid black; padding: 7px}`}</style>
        <table>
          <tr>
            <td>{record.params.firstRepair}</td>
          </tr>
          <tr>
            <td>{record.params.secondRepair}</td>
          </tr>
          <tr>
            <td>{record.params.thirdRepair}</td>
          </tr>
          <tr>
            <td>{record.params.fourthRepair}</td>
          </tr>
        </table>
      </Box>
    </Box>
  );
};

export default ShowJobOrder;
The last part of adding a custom component is appending it to a resource of choice. We’re going to need ‘appointment.resource.ts’ for that. We’re going to add an ‘actions’ parameter to our ‘CreateAppointmentResource()’ function under the ‘options’ parameter.
import { AppointmentModel } from '../../models/appointment.model.js';
import { CreateResourceResult } from '../interfaces/createResourceResult.interface.js';
import { mongooseMenu } from '../index.js';
import { Components } from '../componentLoader.js';

export const CreateAppointmentResource = (): CreateResourceResult<typeof AppointmentModel> => ({
  resource: AppointmentModel,
  options: {
    navigation: mongooseMenu,
    properties: {
      date: {
        isTitle: true,
      },
      _id: {
        isVisible: false,
      },
    },
    actions: {
      showJobOrder: {
        actionType: 'record',
        icon: "Document",
        component: Components.ShowJobOrder,
        handler: async (request, response, context) => {
          const { record, currentAdmin } = context
          return  {
            record: record.toJSON(currentAdmin),
          }
        }
      }
    },
  },
});
The very last thing is adding the ‘componentLoader’ to our AdminJSConfig. Be sure to also import it from the original file!
export const generateAdminJSConfig = (): AdminJSOptions => ({
  rootPath: '/bikes',
  branding: {
    companyName: 'VeloStore',
  },
  resources: [CreateCustomerResource(), CreateBikeResource(), CreateAppointmentResource()],
  componentLoader,
});
And just like that, once you create a bike, customer, and appointment document you will be able to generate a simple job order page for them.
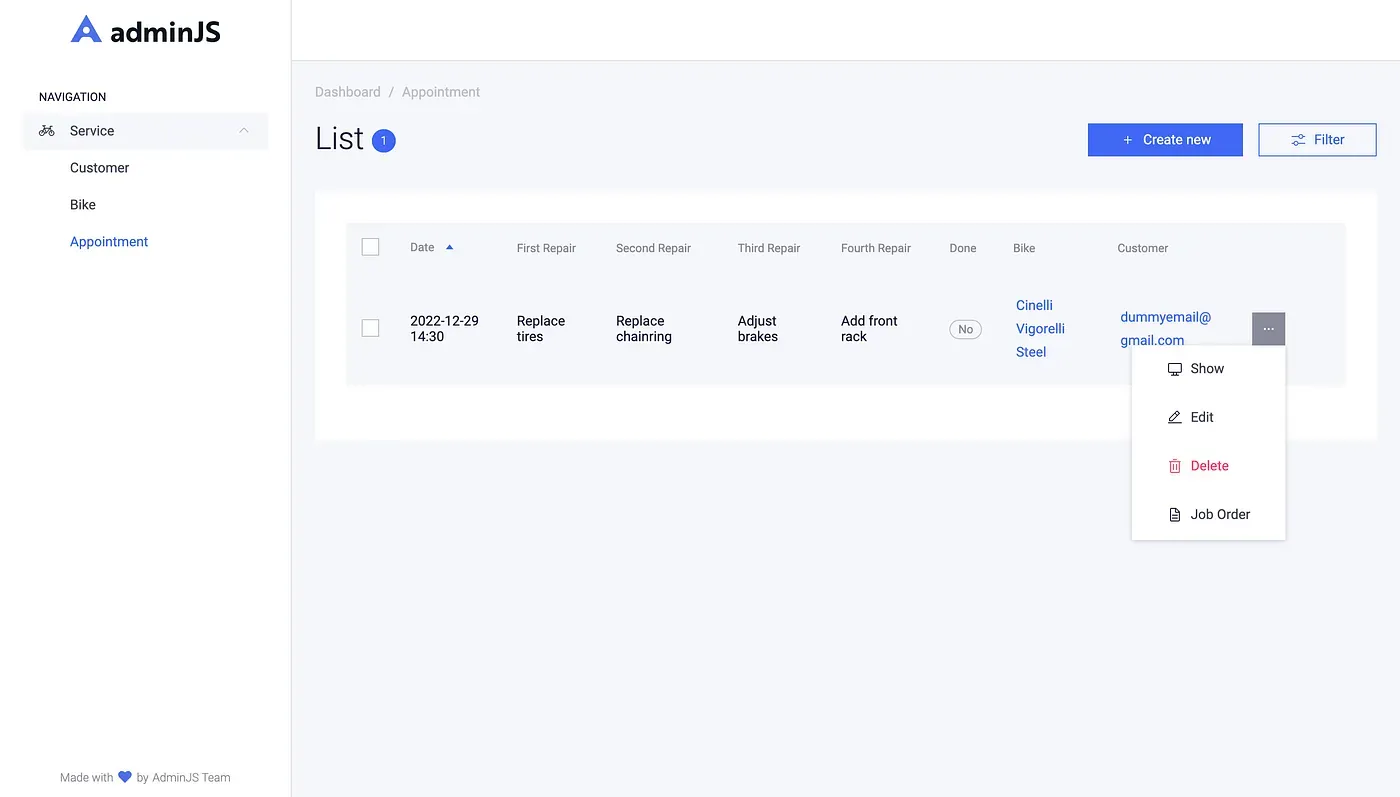
The ‘Job Order’ button is available to generate the order card for a specific appointment.
Further steps
We’ve created a very simple custom CRM software based on AdminJS for a service-based brick-and-mortar store. The main benefit this brings is the ability to look up the history of all the repairs carried out and generate job order cards for both you and the customer. With custom CRM apps, sales reps can easily leverage customer data to better organize their business processes and increase customer satisfaction rates.
A good feature to implement would be a one-button printing of the job orders, so you can attach them to the bike as they come into the workshop.
If you run into issues while building your custom CRM system, or would like to have a quick chat with me and the team behind AdminJS, be sure to check out our Slack Community. If you are looking for an even easier way of building your own CRM system, we’ve got a made-to-order Cloud-based solution for which a trial period is now available!
